Get in Touch with Zhouxiang
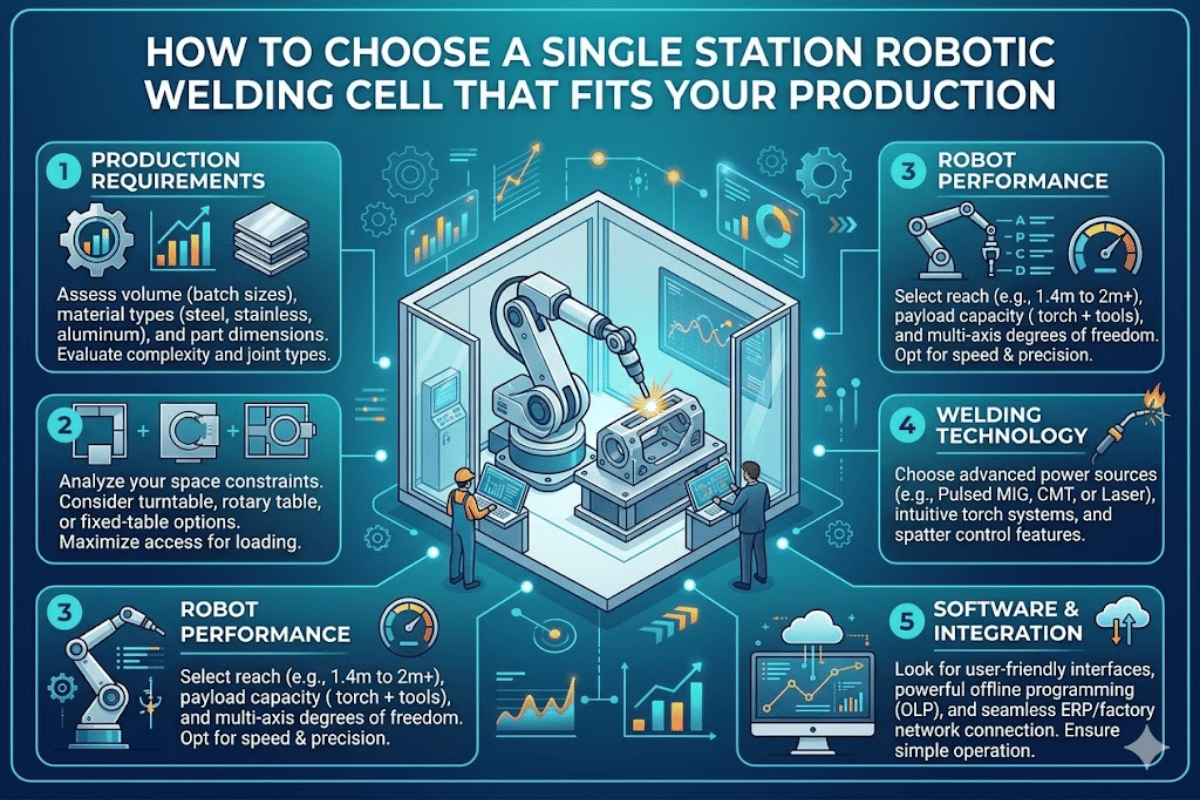
How to Choose a Single Station Robotic Welding Cell That Fits Your Production
Larger welding shops producing 50 to 500 repeatable identical parts per day are faced with the same question: is a single station robotic welding cell sufficient, or is it better to skip the single station option and go directly to a dual station layout? This depends mostly on your part size, weld cycle time, and your operator’s ability to load the next workpiece quickly. This briefing shows the subassemblies, configurations, prices, and design decisions — based on data from over 1,000 robotic welding cell installations in steel fabrication, shipbuilding, and heavy manufacturing workshops.
What Is a Single Station Robotic Welding Cell?
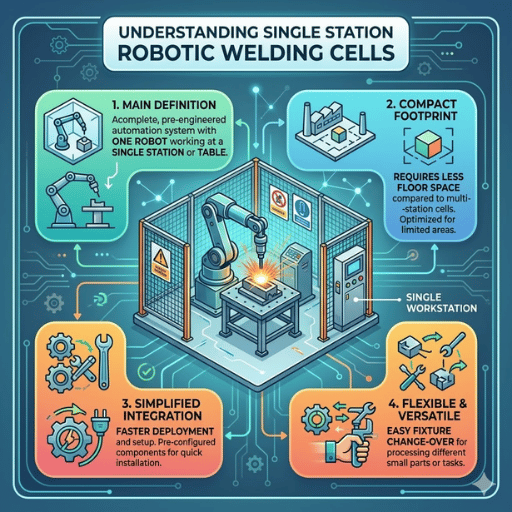
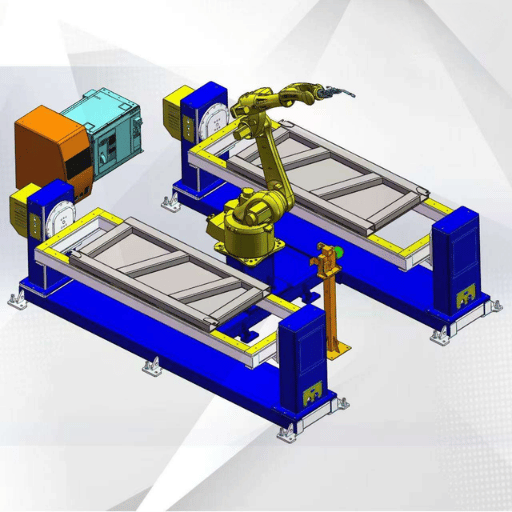
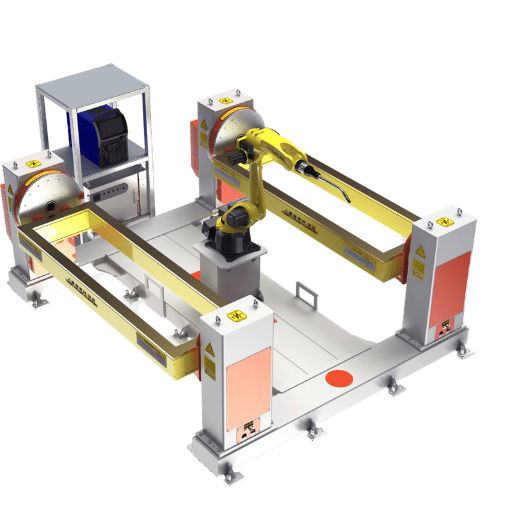
A single station robotic welding cell is a self-contained automated welding system in which one robot and one workpiece positioner share a fixed workspace. The operator loads a work piece, steps out beyond the safety cell boundary and the robot completes a pre-programmed welding process — whether MIG/MAG arc welding, TIG, or laser welding.
Unlike the entire production line full of multi-robot stations that often require whole factory floors to fit, a single station cell takes up approximately 3 m × 4 m (about 130 sq ft) of floor space. This modest footprint is the most cost-effective entry point for workshops moving from manual welding to automation.
542,000
Industrial robots installed globally in 2024
21%
Used in welding and soldering applications
$10.38B
Global robotic welding market size (2025)
Source: IFR World Robotics 2025 Report — International Federation of Robotics
The demand for welding automation continues to grow because of the growing shortage of skilled workers in welding trades. Workshops that once relied on three or four trained welders now can’t fill a single position and a single station robotic welding cell allows semi-trained operators to produce while the welder is in the programing and quality check station.
Core Components of a Robotic Weld Cell
Each and every robotic welding cell — whether pre-engineered or custom built — has the same eight functional groups of components. Understanding the role of each element will help ensure you don’t over specify (money wasted), or under specify (future pipeline capacity will suffer).
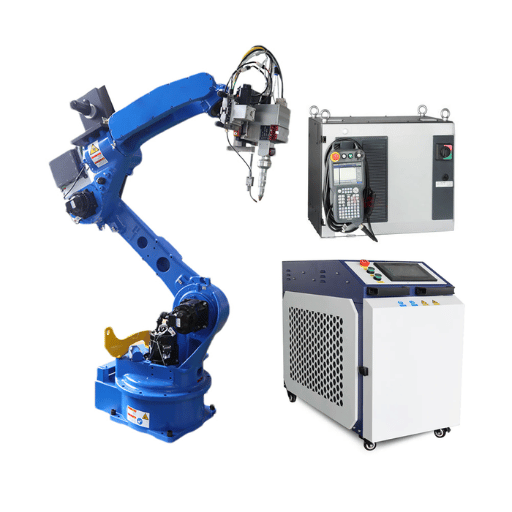
1. Welding Robot (6-Axis Articulated Arm)
The robot arm presents the welding torch along the programmed path with repeatable precision. Industrial welding robots usually range 6 axes of movement, 0.05 mm of repeat precision and 6-20 kg of payload. The reach can be from 1,400 mm on smaller arms up to 2,010 mm on extended reach units — pick whatever length best suits your largest weldment dimension.
| Specification | Standard Cell Robot | Extended Reach Robot |
|---|---|---|
| Axes | 6 | 6 |
| Reach | 1,440 mm | 2,010 mm |
| Payload | 10 kg | 12 kg |
| Repeat Accuracy | ±0.05 mm | ±0.05 mm |
| Protection Rating | IP56 / IP67 | IP56 / IP67 |
| Weight | 210 kg | 313 kg |
2. Welding Power Source
The power source manages arc voltage, wire feed speed, and welding parameters. Digital inverter based sources (available from Miller, Fronius, Aotai, etc.) allow the robot controller to vary parameters during weld which is critical when working on parts with different joint geometries. Check the amperage rating of your power source against the thickest material you work with: 350A covers a broad range of structural steel, 500A for heavy-duty plate weld.
3. Positioner
The positioner manipulates and orientates the workpiece so the robot can reach all weld joints in an orientation producing the least spatter and best weld quality. Types and common options include:
- Headstock and tailstock positioners hold a cylindrical or framed workpiece between two rotary chucks — intended for pipe assemblies and beam sections.
- Single-axis servo-controlled turntables orient flat workpieces for efficient fillet welding all around
- L-shape or H-shape tilt-rotate positioners incorporate a rotary axis for more complicated three-dimension weldments such as brackets and gusset plates
Our engineers have found that positioner selection accounts for about 30% of overall cell cost – and can often be the key to achieving reliable high-quality welds from one run to the next, or regularly reworking weld locally in the cell.
4. Fixture and Clamping System
Fixtures keep raw parts in sharp position to enable repeatable weld placement. A well-tested fixture achieves the right balance between clamping force and thermal expansion – clamp too heavily and parts distort as temperature rises in the weld cycle. Pneumatic or hydraulic clamp systems release automatically once welding is complete, reducing unload time by 40-60% versus toggle clamps.
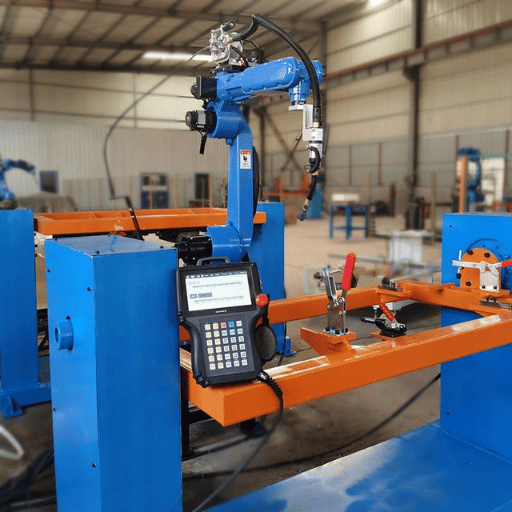
5. Robot Controller and Programming Interface
Controllers manage weld programs, define weld path end points, synchronize robot motion with positioner rotation, and handle all I/O (16 inputs, 16 outputs at 24VDC is typical). Leading edge controllers can support offline programming with MotoSim or RobotStudio software – program weld trajectories on an engineering workstation and test it off-line before you put it on the shop floor, saving cell time while setting up.
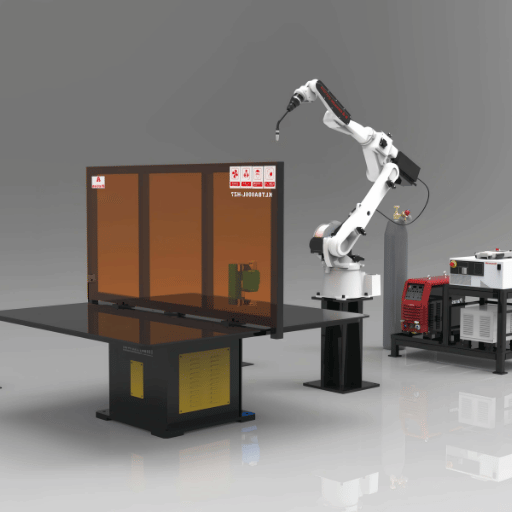
6. Safety Systems
Every robotic weld cell must be enclosed for operator safety during operation. Most common safety hardware includes:
- Perimeter fencing with interlocked access gates
- Light curtain sensors at load/unload openings
- Emergency Stop Buttons (at a minimum, one at the operator panel, another at the cell entrance)
- Arc flash protection shields
- Fume extraction systems
All safety features must meet ANSI Z49.1 (Safety in Welding, Cutting and Allied Processes), and ANSI/RIA 15.06 for industrial robot configuration. Collaborative robot (cobot) cells needed for human-robot co-existence must also meet ISO 10218-2 standards.
💡 Pro Tip
Before approving a cell configuration ask your integrator to run a 3D reach analysis. This verifies your robot can comfortably access all weld joints without collision with fixtures and positioner – revealing clearance issues prior to fabrication.
Single Station vs. Dual Station Weld Cells
A common misconception about welding automation: you can always expect to double your throughput with a dual-station cell. In truth, the gain hinges on the ratio of weld cycle time to load/unload time.
| Factor | Single Station | Dual Station (Rotary Table) |
|---|---|---|
| Footprint | ~12 m² (130 sq ft) | ~20 m² (215 sq ft) |
| Robot Idle Time | Robot waits during load/unload | Robot welds while operator loads the other station |
| Station Change Time | N/A | 2-3 seconds (180° rotation) |
| Throughput Gain vs. Manual | 3-4× with skilled operator | 4-6× (eliminates robot idle during loading) |
| Typical Cost Range | $130,000 – $200,000 | $200,000 – $350,000 |
| Best For | High-mix / low-volume, large parts, first-time automation | High-volume runs, short cycle times, continuous production |
In cases where single station is best: say your weld cycle time is greater than 8 minutes, and load/unload takes 90 seconds – your robot is only inactive 16% of the time. A dual station setup would cost significantly more but would give you only that 16%. In high-mix shops running 10-20 different parts weekly, easier fixture changeover can trump raw cycle time improvements.
In cases where dual station is best: sub-3-minute weld cycle time with 2-minute load time means your robot is inactive 40% of the time – that is where a dual station with rotary table is a true ROI. The two stations rotate 180° in just 2-3 seconds, and the robot immediately launches into its next weld cycle while the operator is loading parts on the other side.
⚠️ Important
Don’t expect to get double output from your dual station relative to a single station. Typical benefit will be set by your specific weld-to-load cycle time ratio. Calculate potential benefit before you buy into the bigger, more expensive cell.
How to Select the Right Robotic Welding Cell for Your Shop
Based upon over 1,000 welding automation projects completed in more than 50 countries, the Zhouxiang team has narrowed down the decision process to five points that account for 90% of specification errors we see in the field.
5-Point Selection Framework
- Part envelope and weight – Measure largest weldment (L × W × H), and heaviest weldment assembly. This drives robot reach, positioner load limits and floor area needed.
- Weld joint type and positions – Count joints per weldment and record type (fillet, butt, lap, groove). Orient parts with all sides jointed with a tilt-rotate positioner. Parts with joints orientated on only one plane can use a simple turntable.
- Daily volume and part mix – High-volume / low-mix shops benefit from dedicated fixtures and pre-engineered cells. High-mix / low-volume shops benefit from modular fixture plates and fast-change tooling.
- Material and thickness range – Standard rectangular carbon steel plates below 12 mm can use standard MIG settings. Higher strength and different materials such as stainless, aluminum or plates over 20 mm probably require pulse MIG, TIG or Tandem wire mode of welding. Each mode affects power source and torch selection.
- Planned growth path – Select a robotic welding system that will grow with your shop and new needs. Single station cell with a ground rail can grow to a 2 stations and extend its travel for longer weldments without needing to be replaced.
“The most expensive robotic welding cell is the one which does not match your actual production requirements. We have seen shops buy dual-station systems for 200 weldments per day when a single station can handle all that work plus room for growth.”
— Zhouxiang Engineering Team, based on project delivery data across 1,000+ installations
What Does a Robotic Welding Cell Cost?
Pricing is the first thing every shop wants to hear and in my opinion the simplest answer is: it depends what you need. Here are some real-life market ranges listed by system complexity for 2025-2026.
| System Type | Price Range (USD) | Includes |
|---|---|---|
| Cobot Welding Cell | $50,000 – $150,000 | Collaborative robot, power source, basic fixture, safety scanner |
| Pre-Engineered Single Station | $130,000 – $250,000 | Industrial robot, positioner, safety enclosure, power source, controller |
| Custom Robotic Welding System | $250,000 – $600,000+ | Configured with multiple robots, multi-positioner, seam tracking, offline programming |
Pricing data from CLOOS North America 2025 Cost Guide
Additional hidden costs to plan for include: Fixturing costs ($5,000-$40,000+), shipping and setup ($5,000-$15,000), training operators ($3,000-$10,000), and yearly service contracts ($5,000-$25,000/year). Fixturing always catches first-time buyers by surprise – fixing a complex weldment with a single fixturing station can cost as much as $5,000 per weldment itself.
12-24 mo
Typical ROI payback period
3-5×
Productivity gain over manual welding
$10,000+
Downtime cost per shift (industry avg)
International Federation of Robotics reports the advantages of robotic welding include saving up to 50% of labor and material costs. For a shop running two shifts with a single manual welder at $28/hr fully loaded, this amounts to roughly $116,000/year and makes a $150,000 pre-engineered weldment worth its money in under two years.
Shops new to automation can start with a pre-engineered single station robotic welding cell that arrives ready to weld requiring little or no site preparation – cutting installation time from weeks to days.
Common Setup Mistakes That Delay Your Welding Cell ROI
After building hundreds of robotic welding cells our project engineers constantly see the same five mistakes that, each one, can add weeks to the project’s ramp up and thousands of dollars in lost production.
Mistake 1: Skipping the Tool Center Point (TCP) Calibration
Some robotic weld operators teach weld paths by eye, without setting the TCP–the precise spot at the tip of the welding torch that the controller uses as its default reference. While the weld appears smooth on a straight-weld, angles, circles, and multi-pass joints become unpredictable welding results and arc length variations because the robot defaults to an erroneous reference point. According to ABICOR BINZEL’s data from the field, manipulating where the TCP points on weld paths ranks among the top five reasons for robotic welding failure.
Mistake 2: Over-Constraining the Fixture
Clamping parts together too tightly to prepare for welding leaves no room for heating expansion. Weld sequences fight the material’s physical shape, creating internal stress that distorts parts at the end of the weld. Remedy this by designing fixtures with floating references so parts can “breathe” slightly in the anticipated direction of heating.
Mistake 3: Ignoring Consumable Maintenance
Debris buildup in the wire liner is the most common cause of wire-related feed problems with filler metals, resulting in burnt back. If the liner is too short, it will not feed all the way home into the retaining head. Plan to change liners as part of your regular preventive maintenance; wait until your shop suffers a LOS (Loss Of Schedule) due to filler wetting problems, and it may be too late.
Mistake 4: Wrong Power Source Rating
Configuring your power source below what you need to support your thickest material causes the system to constantly hunt for the right arc settings — wasting time and consumable life. Overspecified settings can also be costly. Take the time to match your power source to your real production needs, not your single heaviest part.
Mistake 5: No Offline Programming Strategy
Program all your weld paths with the physically-installed robot for money saving, high-mix applications, it slows the automation process, requiring 20-30% of each shift to be programmed, with the cell sitting around. With off-line programming software, you create, simulate with 3D visualization, and troubleshoot programs on a PC, then bring them over and upload them, saving valuable production time.
💡 Pro Tip
Reducing downtime through preventative maintenance can include scheduling a daily gas nozzle wipe, weekly liner inspection, monthly TCP verification, and quarterly calibration test. Shops that minimize unplanned shutdowns plan maintenance for robotic welders, treating them like CNCs.
Frequently Asked Questions
Q: Are robotic welding cells worth it for small fabrication shops?
View Answer
Yes, if your shop produces at least 30-50 repeat parts daily. Cobot welding cells offer an even lower barrier to entry, but require proper safety measures. Calculate whether your annual labor savings outweigh your cell lease or loan payment on a monthly basis, and the ROI becomes clear. If you’re a shop welding the same part geometry repeatedly, even a single station cell may repay itself in 18 months.
Q: How long does it take to install a single station robotic welding cell?
View Answer
Pre-engineered cells: 3-5 days for mechanical install, another 1-2 weeks for programming and operator training. For specially configured positioners, plan on 4-8 weeks.
Q: What welding processes can a robotic cell handle?
View Answer
Most robotic arc welding systems are based on GMAW/MIG for the high build rates and ease of automate, but many shops have cells that run FCAW or GTAW/TIG for precision applications, flux-cored arc for heavy plate, or laser welding for very thin materials requiring minimal heat input. The welding process selection depends on the geometry and the quality requirements of the materials.
Q: Do I need a skilled robot programmer to run a welding cell?
View Answer
Not necessarily. Contemporary welding cells with teachless programming systems can import 3D model files and automatically generate weld paths. Teach pendant programming still mandates training (40-80 hours), but offline programming software enables engineers to develop programs on a PC while actual weld operations are a production line. Most shops have one or two technicians designated as a robot programmer, while operators are responsible for loading and watching the cell.
Q: How does a robotic welding cell improve weld quality?
View Answer
Robots produce precise welds because the torch angle, travel speed, and wire feed are carefully controlled on every pass. Human welders tend to modify these parameters unconsciously, influenced by tiredness, movement shifts, and converging visual cues. Robotic weld cells with integrated seam tracking sensors detect deviations in the joint in real-time while building the weld and change the torch path – integral seam tracking maintains steady product quality even with 70% weld joint fit-up deviation. Defect rates typically decline 80-90% against manual welding.
Q: What safety features are required for a robotic welding cell?
View Answer
At a minimum: perimeter safety fencing, interlocked access gates, emergency stop controls, light curtain sensors at all operator access points, arc radiation shields. In the United States, robotic welding cells must be certified to ANSI/RIA 15.06 (robot safety) and ANSI Z49.1 (welding safety). Any collaborative robot cell functioning without perimeter fencing should also be in compliance with ISO 10218-2 and ISO/TS 15066 rules (force/speed limiting). Always perform an itemized risk assessment using AWS D16.3M prior to start-up.
Ready to Configure Your Welding Cell?
Provide us a part outline, daily production rate, and material type. Our engineers can advise of the best robotic welding solutions for your needs – with a rough quote within 48 hours.
About This Analysis
Zhouxiang has been building welding automation systems since 1991 and has over 1,000 robotic welding cells solutions operating in over 50 markets world-wide. The quoted figures are based on public market data and our own 2024-2025 project quoting system. robot configuration in the quote makes use of our most current single station product line. We are a robot producer – not a third party distributor – so our selection process is inspired directly by our own project case studies, buildup, commissioning, and lifecycle support.
References & Sources
- World Robotics 2025 Report — International Federation of Robotics
- ANSI Z49.1: Safety in Welding, Cutting, and Allied Processes — American Welding Society
- ISO 10218-2: Robotics — Safety Requirements for Robot Systems and Integration — International Organization for Standardization
- How Much Does a Robotic Welding Cell Cost in 2025 — CLOOS North America
- Welding With a Robot — The 5 Most Common Mistakes — ABICOR BINZEL
- AWS D16.3M/D16.3: Risk Assessment Guide for Robotic Arc Welding — American Welding Society