Get in Touch with Zhouxiang
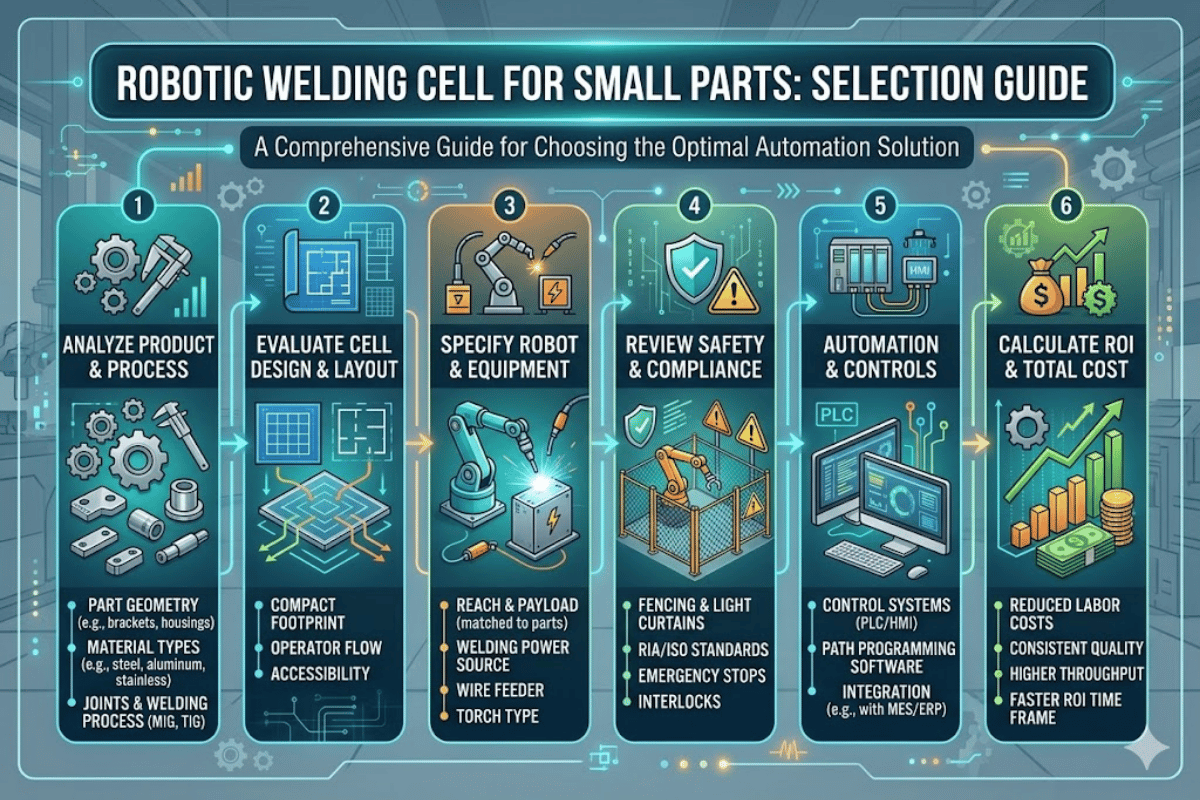
How to Choose the Right Robotic Welding Cell for Small Parts
Most robotic welding cells on the market are designed around heavy structural steel – H-beams, box columns, long seam runs. But if your shop welds brackets, fittings, flanges, or other small parts below 500 mm, those oversize cells will use up your floor space, budget, and cycle time. In this guide, we’ll cover what really counts for selecting a robotic welding cell for small parts: the key weld components, how cobots work versus industrial robots, understanding sizing, what you can expect to pay, and the pitfalls that catch first-time buyers.
What Is a Robotic Welding Cell? (And Why Small Parts Need a Different Approach)
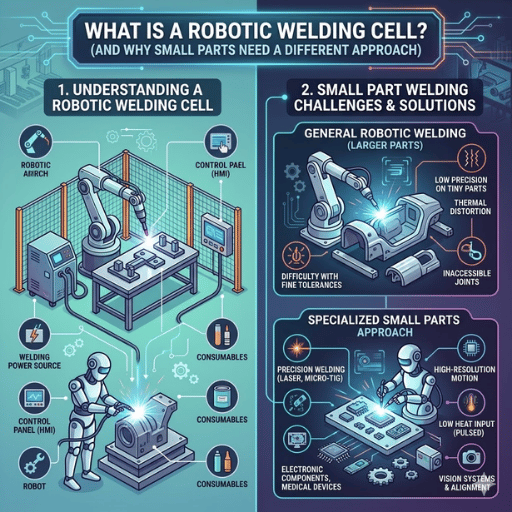
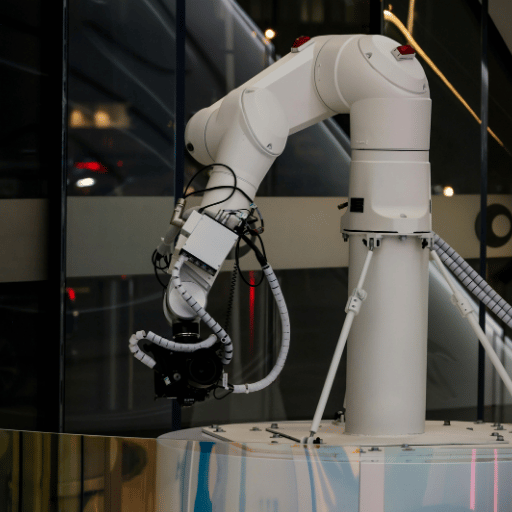
A robotic welding cell is a self-contained production unit where a robot arm, welding power source, positioner, torch, controller, and safety enclosure all work together to execute welds without manual intervention. The IFR World Robotics 2025 report recorded 542,000 new industrial robot installations globally in 2024, more than double the total of ten years prior, and welding continues to be a leading application.
Normal robotic welding cells are built for the market of big workpieces: 2,000+ mm reach envelopes, heavy-duty positioners with 500+ kg specs, and footprints that use 20+ square meters of floor space. For small-part welding, the opposite is true. You need a compact design, with a reach envelope targeted for parts in the 50-500 mm range, a positioner optimized for rapid indexing and a cell footprint that can be squeezed into already tight existing production lines – frequently less than 10m2.
💡 Pro Tip
The torch remains the same – you can still Mig, TIG, and arc welding in compact cells. But the change is in access geometry. small parts require tighter joint access angles, and the torch will often have to go around multiple sides of a same part. A cell designed for long linear seams will struggle with that kind of multi-axis work.
Key Components Inside a Small-Part Robotic Welding Cell
All robotic welding cells use the same core components but for small parts, they must be specified differently. Here is what sits inside a typical cell, and what you should look for.
| Component | Role | Small-Part Spec Focus |
|---|---|---|
| Robot Arm (6-axis) | Moves the torch through programmed weld paths | Reach 1,400–2,010 mm; payload 10–12 kg; ±0.05 mm positioning accuracy |
| Positioner | Holds and rotates the workpiece for multi-angle access | Servo-controlled headstock; dual-station for load/weld overlap; rated for parts ≤150 kg |
| Welding Torch | Delivers arc energy to the joint | Slim neck geometry for tight joint access; air or water cooling; quick-change mount |
| Power Source | Supplies stable welding current and voltage | Digital inverter, 350–500 A; synergic programs for thin-wall materials (0.8–3 mm) |
| Controller | Runs the robot program and manages I/O | Offline programming support (SolidWorks/Tekla import); touchscreen pendant |
| Safety Enclosure | Protects operators from arc flash and moving parts | Full perimeter safety guarding including light curtains or interlocked doors; compact cage ≤3 × 3 m |
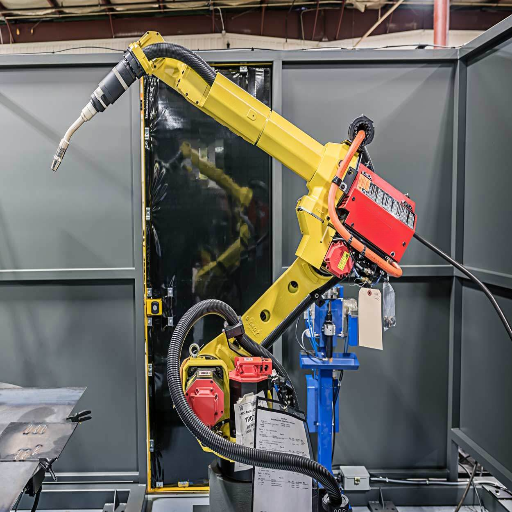
The robot arm is the centerpiece. For arc welding small parts, a 6-axis robot with 1,440-2,010 mm reach covers the working space without overshooting the cell boundary. Zhouxiang’s ZXR series, for example, pairs a 6-axis arm with a servo-controlled dual-headstock positioner inside a single integrated frame — the operator loads parts on station 1 while the robot welds on station 2, and the positioner indexes to swap positions. That load/weld overlap is what drives throughput in small-part production. See how the single-robot welding workstation integrates these components into a ready-to-weld package.
Cobots vs. Industrial Robots: Which Fits Your Small-Parts Workflow?

The cobot welding cell has been promoted by many shops adopting welding small parts in mixed bunches. But, a good cobot is not a guaranteed replacement for industrial robots when small-part welding. Which cobot is right for your shop depends on your cycle volume, part complexity, and budget.
| Factor | Cobot Welding Cell | Industrial Robot Cell |
|---|---|---|
| Typical Cost | $30,000–$70,000 | $50,000–$150,000+ |
| Payload | 5–16 kg | 6–25 kg |
| Weld Speed | Slower (safety-limited motion) | Faster (full-speed operation in guarded cell) |
| Programming | Hand-guided teaching, no coding needed | Pendant programming or offline software |
| Safety | Force-limiting sensors per ISO/TS 15066 | Full perimeter guarding per ANSI/RIA R15.06 |
| Best For | Low-volume, high-mix (<50 parts/day) | Medium-high volume (>200 parts/day) |
| Portability | Easy to move between stations | Fixed installation (bolted to floor) |
Collaborative robots excel in job shops where part variety shifts weekly. Hand-guided teaching eliminates robotics programming skills, and the compact footprint lets you roll a cobot welding cell between workstations. But that real-time reconfigurability means longer cycle times and a lower weld mass flow.
Industrial robot cells are the right choice if you have repeatable part families running batch sizes of hundreds. Like all automation, the better investment is when you have high daily throughput. An off-the-shelf industrial cell with a dual-station positioner is the faster runaway, unattended shift solution. One technician keeps a dedicated weld station running, loading the next batch on the second station. Cobots cannot compete with this throughput.
💡 Pro Tip
For daily output of 50-200 small parts, the choice is not always obvious. Run a production time study comparing your top three parts on the following criteria: fixture load time, weld time, and changeover time. If weld dominates cycle time (greater than 60%), you should choose an industrial cell. If changeover dominates, an agile cobot transfer will produce more parts per day.
How to Size and Select the Right Welding Cell for Small Parts

Don’t let the price of a robotic welding cell cloud your judgment before buying. Selection starts with your parts, not the robot catalog. Use this five-step method to help you select the best cell specifications to suit your production plan.
5-Point Cell Sizing Checklist
- Part Envelope – measure the largest part you need to weld, add in 20% for fixture maximum wall clearance. An accurate measure is 300 × 200 × 150 mm: you will need a welding robot with minimum reach of 1,440 mm from the top of the fixture plate to the sides of the work envelope.
- Joint Access – determine the most demanding lengths of weld joint on your top 5 parts. Count the number of axes of rotation needed to rotate your part into position. Parts with welds on 4+ sides call for a servo-driven positioner, instead of a fixed table.
- Cycle Time – take the total cycle length of your weld Times (travel speed), and add in fixture load unload overhead. For small parts below 300 mm, typical cycle times range from 45-180 sec. Match this against your daily volume target to determine if you need single-station or dual-station operation.
- Floor Space – find out how much floor space is available to you. compact robotic welding cells for small parts begin at something like 3,000 × 2,200 mm. Leave 800 mm of space away from the operator-side for load-up and maintenance.
- Growth Plan – Will your part variety change over the next 2-3 years? If yes, then select an off-line programming cell with a positioner that can accept a number of fixture plates. This will free you from buying a second cell to accommodate new parts as they come out.
According to the American Welding Society’s Welding Digest, shops buying their first welding robot should start with the simplest parts: “Simple, flat, laser-cut parts with one bend are ideal.” Build mastery on easy wins before tackling complex geometries. This advice matters double for small-part fabrication, where fixture design complexity scales quickly with part variety.
What Does a Robotic Welding Cell Cost? (Budgeting for Small-Part Automation)
Cost is the first thing most shop’s ask -and hardest to answer without knowing your application. Here are real-world costs for global availability, current market, not brand’s make-believe.
| Category | Price Range | What You Get |
|---|---|---|
| Entry-Level Cell | $50,000–$70,000 | Robot arm + basic torch package; bring your own welder and table |
| Mid-Range Cell | $70,000–$120,000 | Robot + integrated power source + positioner + safety enclosure |
| Turnkey Production Cell | $120,000–$250,000 | Dual-station positioner, offline programming, seam tracking, production-ready |
| Cobot Welding Cell | $30,000–$70,000 | Cobot arm + welding package; no safety cage needed; hand-guided teaching |
Beyond the cell itself, budget for these additional costs:
- Installation and rigging: $10,000–$25,000 depending on facility preparation
- Initial programming and fixtures: $3,000–$10,000 per part family
- $2,000-$5,000 (contacts, liners, gas nozzles, preventive maintenance): yearly service
- Operator training: $1,500–$3,000 for basic pendant operation and troubleshooting
12–24 mo
Typical Payback Period
3–5×
Output vs. Manual Welding
Up to 90%
Defect Reduction
For small-part production, initially, a cost-effective “Mid-Range” cell with a single robot and dual-station positioner is your best starting point. This allows you to log higher-rate part families first, test the ROI, then pre-plate fixture plates for other parts later. The productivity’s ROI is captured through the converted labor savings from manual tack-and-weld, often recouping the investment within 12-24 months for two-shift operations.
Zhouxiang’s single-robot welding cell is based on this exact concept – fine pre-engineered, ready-to-go production package with positioner and safety enclosure included.
Common Mistakes When Automating Small-Part Welding
We have done manufacturing with shops on three continents, and these same five mistakes have happened over and over again. They all have cost real money and time.
1. Oversize cell. A shop welding brackets and clips doesn’t need a cell built for 3-meter weldments.
Oversized cells eat up machine floor space, drive up the budgets and complicate programming. Size your cells to your real part envelope – not the largest part you might weld some day.
2. Disregard fixture design. The robotic welding cell is only as repeatable as its fixtures.
If parts move 1-2 mm between loads the robot will weld in the incorrect position. According to the AWS Welding Digest, forcing parts into position damages fixtures and produces poor welds. Invest in precision locating pins and clamps from day one.
3. Programming without realistic conditions. Writing robot programs without the actual jig, clamps, and positioner in place leads to collisions and rework on the shop floor.
Make sure to program under real circumstances.
⚠️ Important
4. Skipping welder involvement. The biggest predictor of failed robotic welding automation is excluding your welders from the evaluation process. Welders understand torch angle, travel speed, and joint access better than any software engineer. AWS recommends that welders — not programmers — be the first operators of a new robotic welding cell.
5. Oversight of maintenance scheduling. Contact tips erode.
Liners gather debris. Gas nozzles gather spatter. Failure to stick with preventive schedule results in burnback, erratic arc and costly down time.
Budget $2,000-$5,000 per year for consumables and scheduled service — far cheaper than emergency repairs.
Frequently Asked Questions
Q: How much floor space does a small-part robotic welding cell need?
View Answer
Compact cells start at roughly 3,000 × 2,200 mm (about 6.6 m²). Dual-station setups run closer to 4,000 × 3,000 mm. Add 800 mm clearance on the loading side.
Q: Can a robotic welding cell handle mixed small-part batches?
View Answer
Yes, provided the cell supports offline programming and uses quick-change fixture plates on the positioner. The operator swaps fixture plates between batches and loads the matching weld program from the controller. Changeover times range from 5 to 20 minutes depending on fixture complexity. Cobot cells handle mixed batches faster through hand-guided re-teaching, but at lower throughput per part. For shops running 10+ part numbers, a cell with offline programming and a fixture library gives the best balance of flexibility and speed.
Q: What welding processes work in a compact robotic cell?
View Answer
Gas metal arc welding (GMAW/MIG) is the most common process in small-part robotic cells because of its speed and ease of automation. Gas tungsten arc welding (GTAW/TIG) handles thin materials and high-precision joints. Flux-cored arc welding (FCAW) works for thicker sections. The cell hardware stays the same — what changes is the torch, wire feeder, and power source settings.
Q: How long does it take to program a robotic welding cell for new parts?
View Answer
For a simple small part with 3-5 weld joints, pendant programming takes 30-90 minutes for an experienced operator. Offline programming with 3D CAD models (SolidWorks, Tekla) can cut that to 15-30 minutes of hands-on time, though the software setup has a learning curve. Cobot hand-guiding is fastest for one-off parts: 10-30 minutes per program.
Q: Is a cobot welding cell safe to operate without a cage?
View Answer
The cobot arm meets the collaborative safety requirements of ISO/TS 15066, but the arc welding process will produce UV light, spatter, and fumes regardless of the type of robot. Most cobot welding cells use partial enclosures or welding curtains to prevent arc flash injuries to other workers nearby. ANSI / RIA R15.06 requires a complete risk assessment for this application.
Q: What maintenance does a robotic welding cell require?
View Answer
Daily: check torch tip, nozzle, and liner for spatter buildup; verify wire feed tension. Weekly: clean the positioner drive and check fixture alignment. Monthly: inspect cable bundles for wear, verify axis calibration, and swap consumables (contact tips, gas nozzles) on schedule. A gun cleaning station running between weld cycles extends consumable life and cuts unplanned stops.
Ready to Automate Your Small-Part Welding?
Tell us what kind of parts and output volume you are manufacturing and we can specify a cell configuration that is right for you.
About This Analysis
Zhouxiang has been designing and implementing robotic welding cells and automated production lines since 1991. Construction details, cost ranges, and fixture recommendations in this guide are based on over 1,000 welding automation projects delivered across 50+ countries. We design single-robot welding workstations, multi- station production lines, and custom positioner systems.
References & Sources
- World Robotics 2025 Report: Global Robot Demand Doubles Over 10 Years — International Federation of Robotics (IFR)
- Robotics Safety Standards — U.S. Occupational Safety and Health Administration (OSHA)
- Welding, Cutting, and Brazing Standards — U.S. Occupational Safety and Health Administration (OSHA)
- Considerations for Your First Welding Robot (Welding Digest, October 2025) — American Welding Society (AWS)