Get in Touch with Zhouxiang
When measuring a welding robot or comparing options, manufacturers tend to begin by considering reach, payload and duty cycle. Those specs are important. But the secret to getting your automation project from blueprint to shop floor or uncovering where it bogs down for months on end? It’s the programming method.
Programming practice dictates how long it will take to get a new part to work, what capabilities the jobforce needs to program it and how much dead time the robot welding cell will have to absorb each time operations switch over. A robot that handles welding tasks perfectly but requires six hours of reprogramming will be a dangerous asset in a flexible shop. And a system that takes two minutes to program itself is only valuable if the team can trust the output.
This report breaks down the three dominant welding robot programming methods, so you can determine the appropriate method for your welding shop. Think of it as a blueprint to evaluating your robotic welding programming or designing your automation setup.
Why Programming Method Is the Single Biggest Factor in System Adoption
According to the International Federation of Robotics, worldwide installations of robots hit 541,302 units in 2023, with arc welding and robotic welding remaining some of the most common applications. Adoption rates are inconsistent between shops, and surprisingly often the obstacle isn’t money. It is about integration friction. While both robot suppliers and integrators have begun providing tools to help automate programming, the programming approach needs to align with the shop.
Most unsuccessful robotic welding initiatives we have encountered can be attributed to incompatibility with the robotic welding programming rather than technology. A shop handling 200 distinct part numbers a month can’t afford to devote four hours to teach each new weld path. A line producing the same bracket 50,000 times doesn’t need a vision-enabled teachless arrangement – a fixed teach pendant setup works well.
Your decision hinges on three considerations: the variety of parts (new job frequency), the skills of the people and the level of idleness your business can run with during setups. Nail this choice, and the robot will fit into your flow like another steady fixture. Mismatch, and the robot will remain idle while your best welder programs it manually – an interval in which manufacturing productivity can rally or it can topple.
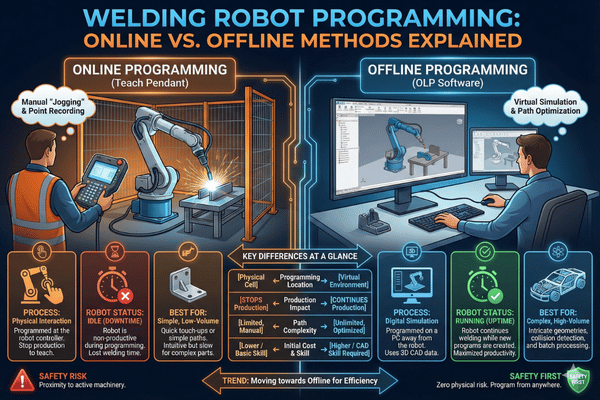
Method 1: Teach Pendant Programming — How It Works, Pros and Cons
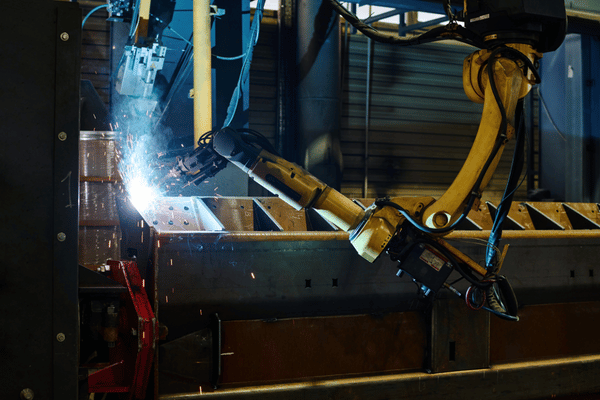
Teach pendant programming (alternately called online teaching) predates all other options and remains the most commonly implemented process. Using a portable handset – known as the teach pendant – the robot is physically traversed by the operator through every weld point. At every position, the operator captures the coordinates, torch angles, approach vector and the balance between joint interpolation (free-axis rotation) and linear interpolation (straight moves). When all points have been collected, the operator determines arc start/stop points, sets the weld parameter levels (wire feed rate, amperage, voltage, and travel speed) and attempts a dry run to determine how well it’s coming together.
Before any of this begins, the operator must first confirm the TCP location and orientation—TCP, the Tool Center Point, defines the exact position of the welding torch in a robot cell relative to the robot wrist. If the TCP location deviates from the true position by 1–2 mm, every programmed position inherits that error. After cell calibration, the operator may need to touch up a position or two if the torch angle changed during a liner swap. TCP recalibration is necessary after every torch replacement or collision.
Teach Pendant — At a Glance
Pros: Understood by experienced welders. No CAD data necessary. Compatible with any weld process (GMAW, GTAW/TIG, SAW). Good consistency once mastered. Lower software capital cost.
Cons: Production stops while programming. Programming a complex shape in multi-pass groove welds can take all shift—structural steel, structural components, anything. Quality is entirely dependent on operator experience. Difficult to migrate program files between part family variants. For a part with many weld locations sharing a common joint type, programming quickly gets dull.
Depending on their aptitude, a trained weld operator requires 40–80 hours of hands-on experience before able to teach a complete welding cycle alone. That training experience includes robot jogging, coordinate system orientation, arc start sequences, and power source interface. For shop floors utilizing MIG or TIG arc welding processes on simple, repeat parts, teach pendant programming remains a tried-and-true selection.
Method 2: Offline Programming (OLP) — CAD-Based Path Generation
OLP shifts work off the shop floor onto a computer. The programmer loads up a CAD source file of the workpiece into OLP software, digitally identifies the groove locations and weld specifying parameters and runs a complete simulation—collision detection, reachability study and program cycle time estimate. When the virtual program fits the bill, it is exported to the robot controller and downloaded to the real welding system. Additional programmers can synchronize multiple robots at shared workcells, coordinated positioners, avoiding arm-to-arm collisions.
Its key advantage: your robot can keep welding while your team prepares the next one. If your shop runs several shifts, this point alone may be sufficient incentive to invest in the technology.
Offline Programming — At a Glance
Pros: No production delay. Handles complex 3D geometries. Examines collision possibilities in simulation prior to proceeding on shop floor. Program storage, version control, reuse capabilities. Integrates with present CAD tools.
Cons: Practitioner must have access to accurate 3D CAD files for every part—not always available in legacy fabrication shops. Staff must include a practitioner skilled in metallurgy as well as robot kinematics. Time lag while simulation step translates to shop floor conditions—allow 15–30 minutes per part for fine-tuning sensors and fixtures.
OLP execution is more suitable for a shop with a controls department and an established CAD–CAM pipeline. If your parts come in hand-drawings or cut plasma and tolerances are in the 3-mm range, simulation-to-reality will cause dissatisfaction. Consider a hybrid approach of teach pendant for critical weld joints combined with OLP for simpler seams.
Before you select robot programming software, verify the platform that runs the program supports the robotic welder brands appearing on your shop floor. Top robot manufacturers like FANUC, ABB, and KUKA each use their own controller language, and not every OLP package translates equally. Some shops bring certified welding inspectors in early during the programming cycle to ensure that the simulated weld programs build code correctly before the first arc is struck – avoiding costly rework on the welding cell that follows. That discipline yields tremendous ROI when it prevents even a single batch of reject parts.
Method 3: Teach-Less / Adaptive Programming — Vision and AI-Based
Teachless programming (sometimes called teach-free or adaptive programming) removes the need for manual teach-in and CAD models. It employs 3D structured-light vision sensors or laser line scanners to scan the work, locate seams, determine torch angles, and auto generate the entire welding path without preprogramming. An operator loads the workpiece, presses start, and the robot figures it out.
This is not science fiction. Seam-tracking technology has been around for decades, but older versions merely modified a pre-taught path. Today’s teachless welding technology determines the path by scanning the joint geometry – finding seams even at different locations on the same workpiece – classifying each joint (fillet, butt, lap, groove), choosing the right welding parameters, and performing the weave; no dedicated program is required for that part.
Teachless Programming — At a Glance
Pros: Near-zero programming time per part. Allows for part-to-part variation and tolerance creep; suitable for high-mix/low-volume runs where the work has many weld locations. Minimal operator skill for path generation. Intuitive user interface as the robot technology handles the detail.
Cons: Higher capital costs for vision hardware. The lighting condition has to remain stable, and the work should be reasonably clean and flat for the scanner to work with consistency. Less empirical installed base than teach pendant systems. The joint must be recognizable by the sensor – internal corners, gaps, or complex joints pose issues.
We have observed shops justify a path time of 45 minutes down to less than 2 with teachless systems. But the real benefit is not just cycle time – it is that a less seasoned operator can run the cell. In a market experiencing ongoing welder shortages, that is more valuable than raw cycle time. When compared to manual welding, even basic robotic welding already yields higher repeatability and throughput on high-volume welding applications.
Programming Time Comparison: Same Part, Three Methods
By the numbers. Here is what it takes to program the same part using each technique: a standard structural steel bracket (8 mm plate, 4 fillet welds, around 600 mm of seam length). The shop used an experienced operator or programmer – not a first-day hire.
| Dimension | Teach Pendant | Offline (OLP) | Teachless |
|---|---|---|---|
| Programming Time | 2 – 4 hours | 30 – 60 min (computer) + 15 – 30 min (calibration) | < 2 minutes |
| Production Downtime | 2 – 4 hours (robot stops) | 15 – 30 min (calibration only) | Near zero |
| Operator Skill Level | Robot operation + welding knowledge | CAD/CAM + welding + robot kinematics | Basic HMI + welding process understanding |
| Changeover to New Variant | Full re-teach (1 – 4 hours) | New CAD model required; re-program + re-calibrate | Automatic — sensor rescans the new part |
| CAD Model Required? | No | Yes | No |
| Weld Quality Outcome | Consistent weld once programmed correctly | Consistent weld — dependent on calibration accuracy | Consistent weld with real-time adaptive correction |
| Best Fit | Low-mix / high-volume (few part numbers, long runs) | Medium-mix with existing CAD pipeline | High-mix / low-volume (many part numbers, short runs) |
Note: Times assume a trained operator/programmer. First-time setup runs 2–3× longer. Weld process: GMAW (MIG) on mild steel. Robot reach and access assumed adequate for all methods. Performance data based on published field benchmarks per ISO 9283 (robot performance criteria) testing conditions.
Across robotic welding, a distinct relationship appears: teach pendant works when changeovers are few and far between. OLP wins when you have CAD and can handle the calibration step. Teachless is ideal when part variety is high and your operators cannot afford to lose costly production hours to programming. In any case, the ability to program quickly and accurately differentiates productive automation cells from costly floor ornaments.
What Skills Does Your Team Need? Training Requirements Per Method
The real challenge here is not choosing a candidate who will give you a series of button presses. It is sourcing a candidate who manages to absorb both the welding process AND the robot simultaneously. Each programming solution alters this equation differently.
| Skill Area | Teach Pendant | Offline (OLP) | Teachless |
|---|---|---|---|
| Training Duration | 1 – 2 weeks (40 – 80 hours) | 4 – 8 weeks | 2 – 3 days |
| Welding Knowledge | Required — must set arc parameters manually | Required — must define weld parameters in software | Helpful but less critical — system suggests parameters |
| Robot Operation | Must learn jogging, coordinate frames, I/O signals | Must understand kinematics, reach limits, singularities | Basic HMI: load program, press start, monitor cycle |
| CAD/Software Skills | Not needed | Required — 3D CAD + OLP software proficiency | Not needed |
| Staffing Difficulty | Moderate — need a welder who can learn robot operation | High — rare combination of CAD + welding + robotics | Low — material handling operator can run the cell |
When evaluating robotic welding systems from different robot manufacturers, training cost is frequently underestimated. A robot may cost $80K-$200K, but losing your sole trained programmer to a competitor can idle the cell for weeks until a replacement is found and trained. Teachless systems have eliminated this single-point-of-failure by bulk provisioning for the greatest number of possible operators. Shops which produce continued investment into training provide welding certification to their robot programmers program longer-lasting staff and fewer quality escapes.
This is also where programming simplicity becomes a factor in evaluating welding robot configurations. Whether your internal weld quality or American Welding Society guides your team, the programming simplicity determines how efficiently a new robot programmer comes online.
How Zhouxiang’s Teachless System Reduces Programming Time
Zhouxiang’s teachless welding robots use 3D vision sensors with laser seam tracking to auto-identify workpiece geometry and generate weld paths in real-time, no CAD files, no teach pendant, no pre-loaded weld programs for each part number.
Here’s how it plays out practically: the operator loads a steel workpiece onto the fixture, presses start on the touchscreen HMI, and the vision sensor scans the part within the robot workcell. The system identifies the joint type – fillet, butt, lap – calculates the torch angle and approach vector, sets the welding parameters depending on material thickness and joint type, and commences welding. In less than two minutes from part load to arc strike, it is complete.
If your shop processes structural steel, heavy equipment frames, or any type of production work where part geometry varies from batch to batch, this type of robotic welding annihilates the programming bottleneck. Your welders focus on fixture setup and quality inspection, not spending hours on a teach pendant. If you seek to program a welding robot for components that run once and never again, this is the only way to do so economically.
Ready to See Teachless Programming in Action?
Request a customized consultation to determine which robotic welding programming method best aligns with your team’s production requirements.
Programming Mistakes That Cost Shops Time and Weld Quality
Through our experience working with numerous robotic welding deployments, we observe the same pitfalls at every shop. Averting these real-time wastes will save you weeks and weeks of aggravation, independent of the method chosen.
- Not running a TCP calibration routine. Every torch swap, liner change, or impact moves the tool center point. Run the calibration routine prior to programming a single weld path, not as the last step before realizing it is way off target.
- Applying a single set of weld settings across different joint configurations. A weld schedule set for fillet welds will not produce the same quality on butt, groove, or lap joints. Match wire feed speed and voltage to each joint configuration independently. Proper control of feed speed and voltage is what separates acceptable welds from rejects.
- Doesn’t account for air-cut moves in between welds. Poor transition paths lead to fixturing and clamping collision issues. Plan the robot air-cut path just as diligently as the welding path.
- Fails to backup weld programs. One crash of controller and dozens of hours of teach pendant work is gone. Maintain a log or change record of every robot program and backup onto network drives, not just on the controller.
- Rushed training. A new robot programmer that breezes through fundamentals will produce inconsistent welds and damage machinery. Plan to spend all the time recommended for your system; the programs for your robot are only as good as the person writing them.
Frequently Asked Questions
How long does it take to program a welding robot?
Completely depends on the approach. Teach pendant path generation for a relatively simple part with 8-12 weld points takes about 2-6 hours of hands-on time. Offline creates the path in 30-90 minutes of computer time, plus 15-30 minutes of on-system calibration. Teachless vision sensor path generation can happen in under 2 minutes per part, with no operator teaching needed. Put another way: a high-mix job shop with many small parts can be offline programmed in a single afternoon, versus many hours for teach pendant method.
Can you program a welding robot without coding experience?
Absolutely – they use no programming language. Teach pendant paths use edge-point passing; all that’s needed are the welding parameters. Teachless requires vision sensor software to generate welding paths from the part model. The only skill needed for offline paths is CAD/CAM programming.
What is offline programming for welding robots?
Offline programming (OLP) involves creating the path outside the factory, with special PC-based software using a CAD model of the work piece instead of guiding the robot on the shop floor. The programmer imports the CAD model, locating weld seam locations, setting welding parameters, simulating for collision, and then uploading the path to the controller. No machine downtime is required during program creation.
What is TCP calibration and why does it matter?
TCP (Tool Center Point) is the physical location of the welding torch tip to the robot wrist. Even minor deviations as small as 1-2 mm will result in all welds missing the seam target – expect burn-through or undercut. Always recalibrate after torch replacements or collision.
How does teachless welding programming work?
Teachless (or teach-free) welding programming uses vision sensors – generally lasers or structured light 3-D cameras – to scan the part and automatically find the seam points. The vision system calculates torch angles and welding parameters and generate a weld path all automatically. The human operator just loads parts and presses Start – no teach pendant paths or CAD models needed. An ideal application for high-mix, high-changeover production.
What training do operators need for robotic welding?
It varies by the method. Teach pendant operators generally need 40-80 hours (1-2 weeks) of learning focused on robot jogging, TCP calibration and weld parameter tuning. Offline programmers require much more time – 4-8 weeks – to learn CAD-to-path software, simulation, and robot kinematics. Teachless system operators need only 2-3 days, because the path is generated by the vision system and the operator loads parts, sets up fixtures and operates basic HMI functions. Also include time for periodical refreshers, particularly after software upgrades or addition of new arc welding processes such as pulsed MIG or CMT in the cell. Most integrators include initial training time in the integration fee, so check what is included in the package before signing.
Find the Right Programming Method for Your Shop
Zhouxiang engineers will analyze the types of parts and production rate of your team skills, and recommend optimal method.
References & Data Sources
- International Federation of Robotics (IFR), World Robotics 2024 Report – Number of industrial robots installed worldwide.
- ISO 9283:1998 – Manipulating industrial robots – Performance criteria and related test method.
- ISO 10218-1:2011 – Robots and industrial robots – Safety Requirements for industrial robots.
- American welding Society (AWS), Welding Workforce Data &Statistics – Forecast for Advance welder Shortage.
- ISO/TS 15066:2016 – Robots and industrial robots – Collaborative industrial robots (now in ISO 10218:2025).